Any time you’re moving sensitive data on the interwebs, it’s a good idea to make sure that data is being encrypted with TLS/SSL. For example, in my home theater configuration I wanted to use TLS to protect my login credentials for Sonarr, CouchPotato, and NZBGet, and the approach I used applies to almost any site and data you might want to secure.1
TLS is becoming more common, but unfortunately it’s still unnecessarily painful and/or expensive to secure personal sites.2 For my home theater setup, there were a few options available:
Option 1: Spend $100-$400/domain/year for a wildcard certificate from one of the established vendors
$100+ per year is more than I want to spend on a wildcard certificate for my personal projects. And if I choose to change my domain in the future I’d have to pay for a new certificate. The benefit of this method is that it is (currently) the only way to secure multiple subdomains such that all devices (even those I don’t manage) trust my certificates.
Option 2: Get a free certificate for one domain and subdomain, and put each service behind a separate path
The free certificates offered by StartCom are an effective way to secure a single domain. As far as I know, they are currently the only place to get a free certificate trusted by the major browser vendors. But these certificates only cover a single subdomain. For example, if I were willing to put each of my home theater services behind a URL like https://mydomain.com/servicename then this approach would work. But I prefer to have a separate subdomain for each service (e.g. https://servicename.mydomain.com), so the free StartCom certificates aren’t sufficient for me.
Option 3: Become my own Certificate Authority and set up my devices to trust my certificates
There’s a bit of configuration and management that goes into signing and managing your own certificates, and depending on exactly what you’re trying to achieve there may or may not be good tutorials out there to help guide the process. Also, the resulting TLS certificates will generate security warnings on any devices where you have not installed your root certificate, so this approach only works well for private use. But if you can get everything working and are comfortable with the tradeoffs, this option provides the most flexibility. And it’s free.
For my home theater configuration, this is the path I’ve chosen. As my own certificate authority (CA), I can issue wildcard certificates for any domain I want. For sites that are intended only for my own use this strikes the perfect balance between security, cost, and simplicity.
Becoming your own certificate authority
At the end of this process, you will have an environment in which you can easily mint new TLS certificates that your devices will trust. Unless you only plan on creating one certificate, I’d recommend creating the environment somewhere permanent.
If you don’t care about the ‘why’ behind the process and you just want the steps, you can find them here.
Note: For information about the details and reasons for each of these steps, please see the references provided at the end of this post. They do a better job of explaining the underlying concepts than I would. This process was synthesized from the information found in those references.
Step 1: Create the directory structure
Decide where you’d like your certificate authority to live, and create the necessary directory structure there.
$ mkdir -p ca/{certs,crl,newcerts,private,csr}
Step 2: Create the index and serial files
The index and serial number files keep track of all certificates created by this CA (which may come in handy if you want to revoke a certificate for some reason).
$ cd ca
$ touch index.txt
$ echo 1000 > serial
Step 3: Create the OpenSSL configuration file
The configuration file will specify the settings to use when generating certificates, both for the CA itself and for the server TLS certificates. The configuration file I use is a modified version of the one described here.3 If you’d like to know the purpose of each setting, you can read about them there (for example, this configuration forces OpenSSL to use SHA256 hashing instead of the now-insecure SHA1).
You can find the configuration file here.
$ curl http://obylysk.com/files/tls/config/raw.txt \
    > openssl.cnf
Step 4: Set the domain environment variables
By default, TLS certificates only secure a single domain. This means that a certificate for *.mydomain.com would not be able to also secure mydomain.com. I want both the site root and the wildcard domain to be covered, so in order to fix this I need to specify Subject Alternative Names (SANs) when creating the wildcard certificate.
The provided configuration file contains an extension block that checks an environment variable to see which SANs to add to the certificate request and certificate. By using an environment variable, the configuration file remains generalized and doesn’t need to be changed for use with other domains.
Replace mydomain.com with your actual domain.
$ export DOMAIN=mydomain.com
$ export SAN=DNS.1:${DOMAIN},DNS.2:*.${DOMAIN}
Step 5: Create the certificate authority private key
This step will ask you to supply a passphrase with which to secure the certificate authority private key. You’ll need to then enter the passphrase whenever you use the key to sign certificates (for both the CA and the server certificates).
Keep this key (and the passphrase) extra safe - anyone with access to it can sign certificates on your behalf, and at the end of this process your devices will then trust those certificates!
$ openssl genrsa -aes256 -out private/ca.key.pem 4096
Step 6: Create the Certificate Authority public certificate
The root CA certificate is what gets installed on your devices, which tells them that it’s ok to trust any certificate signed by this CA. During this step you will be asked to provide some identifying information for the certificate. Since this is your own CA, you can provide as much or as little as you want.
You will need to enter the CA passphrase in this step.
$ openssl req -config openssl.cnf -key private/ca.key.pem -new -x509 \
    -days 7300 -sha256 -extensions v3_ca -out certs/ca.cert.pem
Step 7: Create the wildcard domain private key
$ openssl genrsa -out private/wildcard.${DOMAIN}.key 2048
Step 8: Create the wildcard certificate signing request (CSR)
Create a TLS certificate signing request that will be signed by the CA. You will be asked the same questions from the creation of the CA certificate. Again, feel free to answer how you want for most questions. The exception here is that for “Common Name” you should provide the wildcard domain the certificate is meant to secure (e.g. *.mydomain.com).
$ openssl req -config openssl.cnf -new -sha256 -extensions san_env \
    -key private/wildcard.${DOMAIN}.key \
    -out csr/wildcard.${DOMAIN}.csr.pem
Step 9: Sign the wildcard certificate
Finally, use your CA key to sign the certificate request. You will be asked to verify that you want to sign the certificate and that you want to commit the record to the CA database.
You will need to enter the CA passphrase in this step.
$ openssl ca -config openssl.cnf -notext -md sha256 \
    -extensions server_cert -extensions san_env \
    -in csr/wildcard.${DOMAIN}.csr.pem \
    -out certs/wildcard.${DOMAIN}.pem
The wildcard key and certificate files will be placed in the private/ and certs/ directories, respectively. Copy those out and install them on your server. (I’m planning to write separate post describing how I configure Nginx to use these certificates.) Your site should now be protected by TLS!
Configuring devices to trust your certificates
If you now browse to a site protected with your new certificate, you should get a security warning that looks like this:
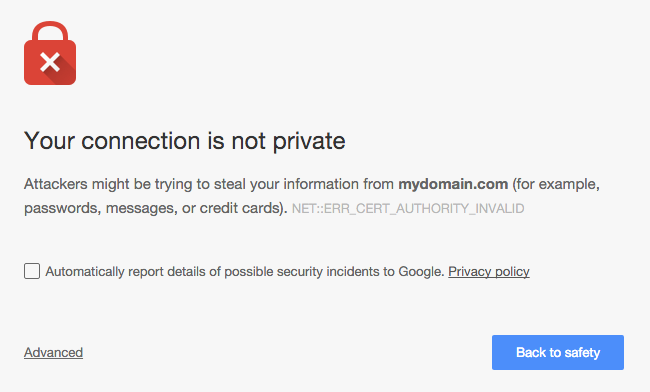
You could simply tell the browser to trust your certificate every time this warning pops up, but that’s both tedious and dangerous - it’s a bad idea to become accustomed to ignoring browser security warnings. Instead, by installing the root CA certificate on a device, any certificate signed by the CA will be trusted by that device (this includes the certificate you just created, as well as any certificates you sign with this CA in the future).
Follow these steps from any device that you plan to use to connect to sites that use these certificates.
Installing the CA certificate in OS X
For some of these steps you will be asked to enter your admin password.
- Copy the CA certificate file (
certs/ca.cert.pem) to somewhere accessible from Finder. - In Finder, double click on the certificate file.
- In the Keychain Access window that opens, find the newly installed certificate. It should be in the System keychain - if not, move it there.
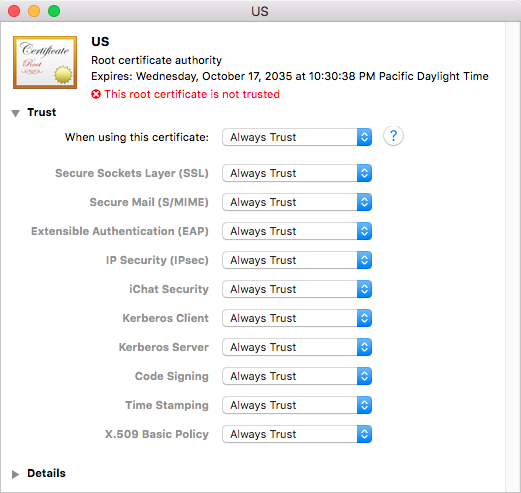
- Double click the newly installed certificate.
- In the info window that opens, expand the “Trust” section. In the “When using this certificate” dropdown choose “Always trust”.
Installing the CA certificate in iOS
These steps are accurate as of iOS 8
- Email yourself a copy of the CA certificate file as an attachment
- Open the email in Apple Mail in iOS, and tap on the certificate attachment
- Tap “Install” in the profile settings page that appears. You can verify the certificate details if you like by tapping “More Details”.
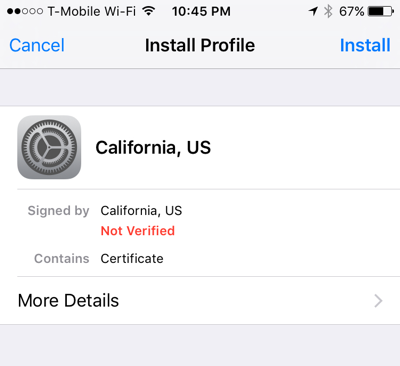
- Tap “Install” in the warning page that appears, then tap “Install” one more time
All done!
That’s it! You should now see a secure connection icon in your browser’s location bar, and all traffic to/from your application will be encrypted and secure.
References
- TLS vs SSL
- OpenSSL Certificate Authority
- Signing your own wildcard SSL/HTTPS certificates
- Multiple domain names on one certificate
- SAN environment variables
-
You may have noticed that this site is not currently running behind TLS. That’s because the self-signing process described here doesn’t make sense for sites that will be accessed by other people - modern browsers would block the site for anyone that hasn’t installed my personal certificate on their devices. I may decide to use one of the free StartCom or Let’s Encrypt certificates for this site since it would only need to work for one domain. ↩
-
This may change very soon once Let’s Encrypt becomes generally available. If so, I’ll try to update this post or make a new one. ↩
-
Note that the referenced configuration file expects that you want to create an intermediate CA for signing server certifictes instead of signing them directly with the root CA. I don’t follow that process here. ↩